Petit4Send
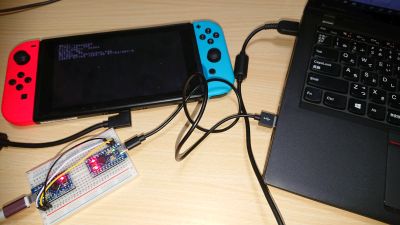
File transfer program between Windows PC and Smile Basic 4 on Nintendo Switch, using Arduino(Pro Micro).
Abstract
File Transfer program from Windows PC to Smile Basic 4 of Nintendo Switch.
Some hardwares(Pro Micro and UART device) are required to use this software.
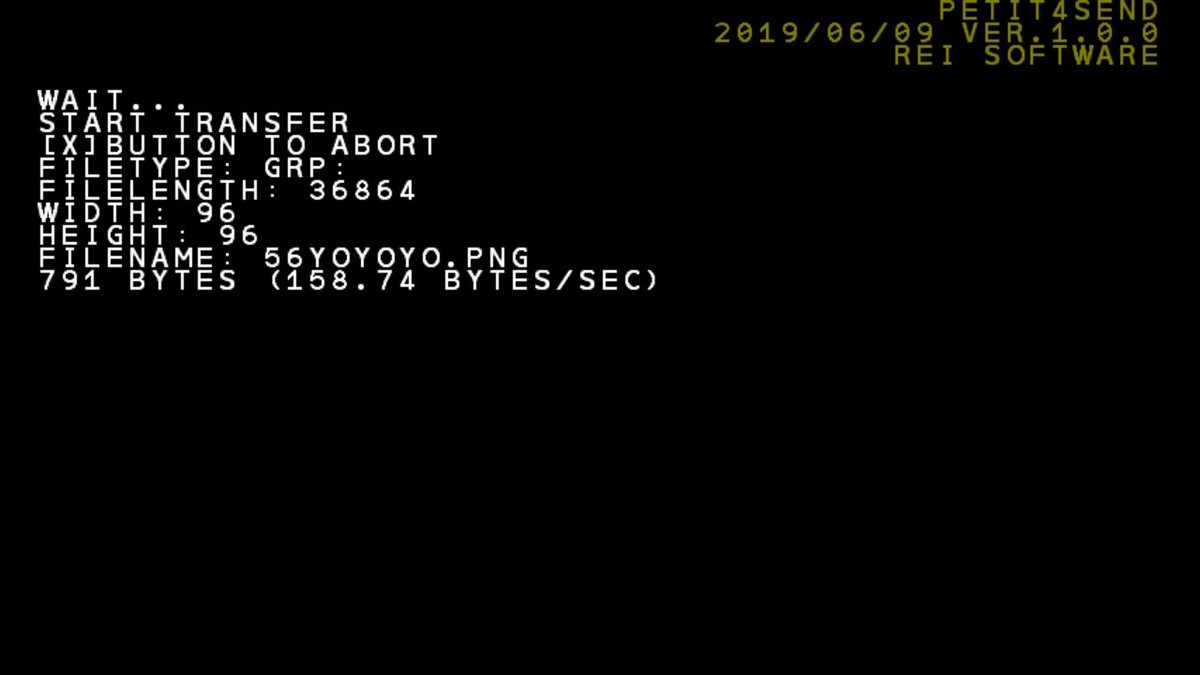
Screen Shot
Environment
- PC side
- .Net Framework 4
- USB port x 1
- Smile Basic side
- Switch
- Smile Basic 4
- micro SD(for image transfer)
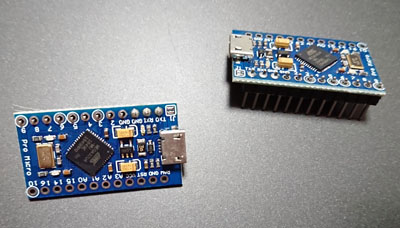
- Arduino
- SparkFun Pro Micro 5V/16MHz x 2 (one is for Virtual Keyboard and another is for UART)
- if you have some other UART device, you can use it instead of one ProMicro.
Specification
- PC - Pro Micro
- UART、9600bps、Duplex
- Pro Micro - Switch
- USB HID Keyboard/Mouse
- maximum 296Byte/sec
- Simplex
- Error detection: CRC16(Koopman)
- File Transfer
- TXT file
- input:UTF-8
- output:UTF-16(TXT)
- GRP file
- input:bmp/png/jpg etc...(graphic files GDI+ can read)
- output: GRP
- DAT file
- input: any
- output: DAT
- Compression
- LZSS/None/Auto
- TXT file
- Keyboard Relay
- All except special key such as Ctrl+Alt+Del.
- Auto Typing
- key within ASCII code.
- Screenshot transfer
- 181kByte/Image
- Compression: LZSS/None/Auto
- output:
- TXT: UTF-8
- GRP: PNG
- DAT: binary
Download
Smile Basic 4
PC
Device
Notice
- Pubic Key for SmileBasic4 links to latest version. old version sources are inclueded with in it
- The source of each version is also included in the ZIP.
- Interoperation is confirmed only corresponded version.
- "*" means that the version contains firmware update.
License, Charge, Donation
License
This software is free of charge. You can use it personally or commercially. You are also allowed to distribute secondary, fix/alter, do reverse-engineering.
Donation
BitCoin
gumroad
PayPal
Description
プチコンは4になっても相変わらず外部ファイルが読めないので、 データを読み込むためのプログラムを作りました。
プチコン4は音声入力がないため、残念ながら音声転送は使えません。 検討した結果、USBのHIDデバイスを自作して、USBキーボードをエミュレートし、 地道に転送するのが一番よさげということになりました。 なので、残念ながらハードウェアが必要になります。
なるべく安く、お手軽に、ということで、 簡単にUSBデバイスを自作できる「Pro Micro」を用いました。 2019年5月現在、amazonで互換機が最安600円程度で入手できます。 これだけでUSBデバイスが作れるのですが、Pro Microにデータを送る手段が必要です。 UARTという簡単なシリアル通信手法があるので、これを使います。 が、PCからUARTで出力するのに、UARTインターフェースが必要になります。 私はこれもPro Microで作りましたが、専用のハードでも構いません。 このページの使用方法などは2台のProMicroをそれぞれ「USBキーボード」「UARTインタフェース」として使うことを前提に書いています。
Pro MicroをSwitchにつないだ際、エミュレートされたUSBキーボードはInterrupt転送を行っており、 Switchからは8msec毎に情報の送信要請がきます。 USBキーボードは要請があるたびにその時点でのキーの押下情報やマウスの移動量をSwitchに送っています。 USBキーボードは同時に6キーの押下+8つの修飾キー(左右のSHIFT、CTRL、ALT、APP(WIN))が判定できます。 キーコードは1バイトですが、一部の値は使えず、また押下データの6つに重複した値は使えません。 プチコン4ではおおよそ180種のキーコードが使え、また修飾キーは4つまで使えます。 押下キー情報は、「180種の内から6つ選ぶ組み合わせ」だけあるので180C6=43424719800通り、おおよそ35bit。 修飾キーは4つで4bit。合計で39bitの情報があります。
SWITCHのクロックとProMicroのクロックとは正確に同期していないため、データを送る際には同期をとる必要があります。 1つのbitをON/OFFすることで同期をとります。 また、同期の「抜け」を確認するために、更に1bitを追加し、2bitのパケット番号としています。
キーボードを用いて転送するため、送る際のコードが「Ctrl+C」だったり「F5」だとプログラムが止まってしまいます。 他のサブプログラムを起動するようなキーでもダメです。 こういった制限を避けるのに、「Ctrlキー」「ファンクションキー」等を回避します。
Ver.1.2.0からはマウスのボタンの情報を追加しました。 チャタリング防止の為か、高速でオンオフすると正常に取得できないので、VSync2回に5bit分の情報を送っています。
プチコン4側では、伝統通り、入力の情報はVSYNC≒16.7msec単位でしか更新されません。 またSwitchとの通信は8msec間隔なので、24msec単位で転送するか、タイミングを制御して転送する必要があります。
以上のようなことから、Ver.1.2.0現在は、 1転送にかかる時間は16.7msec(高速モード)もしくは24msec(低速モード)で、 1転送あたり39.5bit転送しています。
エラー検出はCRC16を用いました。 私の測定では、適切な条件を選べばパケット抜けは1/10000以下で、 3連続抜ける確率はほぼ考慮する必要がなく、 更にCRC16でのエラー見逃し率は1/60000以下です。 ですので、正常に転送された場合はほぼ間違いなくデータは破損していません。
また、転送レートが遅いのでLZSSによる圧縮を適用できるようにしています。
画像転送
PetitModemと同様に、画像によるファイル転送を実装しました。
十分な解像度があるので、2bit/pixel、白黒のみとしています。
いろいろな制限を考慮して1画像あたり181kByte程度転送できるようにしています。
キーボードリレー・自動タイプ
PCと同時にプチコン4をいじるとキーボードがいくつもあって混乱するので、 PCのキーボード入力をそのままプチコン4用に送る、リレー機能を搭載しています。
また、コピペや短いテキストの転送がしやすいよう、自動タイピング機能があります。
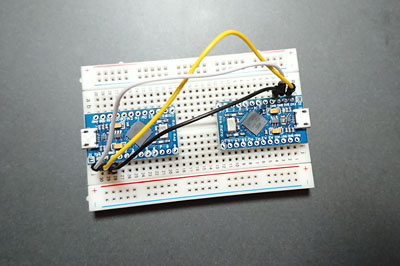
How to make
- buy parts
- Pro Micro 5V/16MHz x2
one is for Virtual Keyboard, one is UART
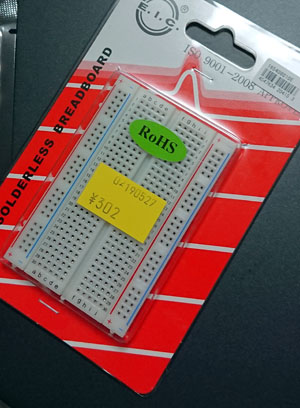
- Breadboard
- cables
- Pro Micro 5V/16MHz x2
- assemble
- Solder ProMicro
- Put two ProMicro on the Bread Board
- Connect pins.
Pro Micro(Switch side) Pro Micro(PC side) TXO RXI RXI TXO GND GND 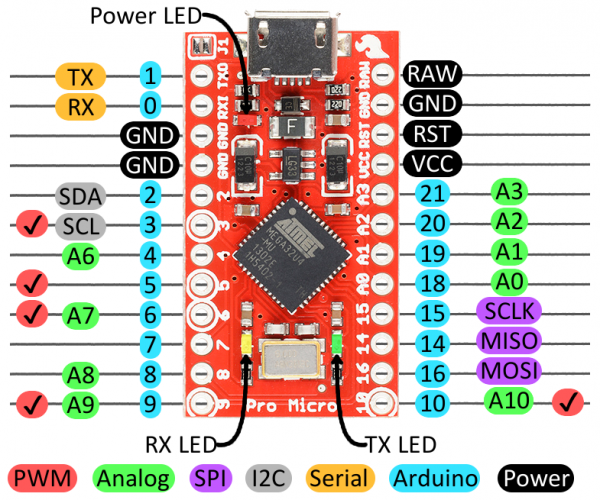
- install ProMicro driver to PC
- Windows10 case
- connect ProMicro and PC with USB cable
- Windows7 case
- download Driver on SparkFun
- install "sparkfun\avr\signed_driver"
- connect ProMicro and PC with USB cable
- Windows10 case
- Write Firmware of Petit4Send to ProMicro(Switch Side)
- Connect Pro Micro(Switch Side) with USB cable
- Boot Petit4Send
- push [File] -> [Write Firmware] and open [Write Firmware for Pro Micro] dialog.
- select port to which ProMicro is connected, and select "Petit4Send.ino.promicro.hex" file.
- push [Write]
- wait untill "Success" dialog is shown. if it fails, remove cable and try again.
- remove ProMicro from PC.
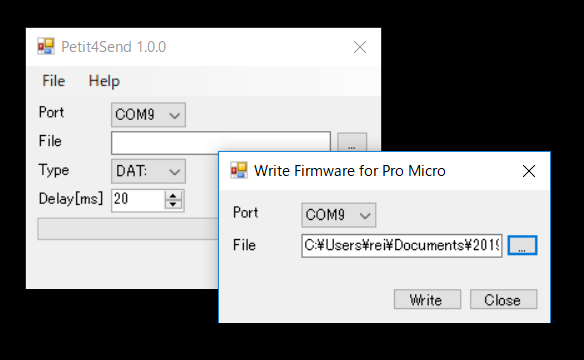
- Write firmware of UART to ProMicro(PC Side)
- Connect Pro Micro(Switch Side) with USB cable
- Boot Petit4Send
- push [File] -> [Write Firmware] and open [Write Firmware for Pro Micro] dialog.
- select port to which ProMicro is connected, and select "USBUART.ino.promicro.hex" file.
- push [Write]
- wait untill "Success" dialog is shown. if it fails, remove cable and try again.
- remove ProMicro from PC.
- Finish
Usage
File Transfer
- Connect ProMicro(PC side) to PC.
- Connect ProMicro(Switch side) to Switch.
- Boot Petit4Send on SmileBasic4.
- Boot Petit4Send on PC.
-
- Fast Mode
- Select [DETECT SYNC KEY] on SmileBasic4.
- Press [Send]->[DETECT] button on PC.
- Wait about 10 sec.
- [SYNC KEY] is displayed on SmileBasic4, enter it to [Sync Key] field of PC. if it is not displayed, confirm connection and try again.
- Slow Mode
- Enter "-1" to [Sync Key] field of PC.
- Fast Mode
- Select [USB RECEIVE] on SmileBasic4
- Select a file which you want to send and file type in which you want to send, then press [Send]
- File Transfer will be started around 5 sec.
- At the end of transfer, Petit4Send wait your confirmation. Press "A" of JoyCon.
- Save and finish.
Image Transfer
- Boot Petit4Send on SmileBasic4.
- Select [SCREENSHOT SEND] on SmileBasic4
- Select File. it should be inside the Project.
- Encoded Image will be shown. Save it by Screenshot button of Switch. if there are some image, save all images.
- Send it to PC.
- Boot Petit4Send on PC.
- Drop Images to [Decode Image] tab.
- Select folders in which you want to save.
- press [Convert] button.
Keyboard Relay
- Connect ProMicro(PC side) to PC.
- Connect ProMicro(Switch side) to Switch.
- Boot Petit4Send on PC.
- Open [Keyboard] Tab on PC
- Press [Start] button.
- During Petit4Send has a Focus, PC keyboard inputs are sent to Switch as keyboard inputs.
Auto typing
- Connect ProMicro(PC side) to PC.
- Connect ProMicro(Switch side) to Switch.
- Boot Petit4Send on PC.
- Open [Typing Send] Tab on PC
- Write or Copy&Paste text sentence you want to send in textbox.
- press [Start].
- the Text in textbox are sent to Switch as keyboard inputs.
Notice
Hex file contained in ZIP is for "Pro Micro 5V 16MHz" If you use "3V 8MHz" type or other Arduino, you need to re-compile from source.
[Sync Key] must be correct. If you enter "-1" as sync key, it become "Slow Mode"(206Bytes/sec). [Sync Key] is valid until USB connector is removed or Switch enters sleep mode.
copyright © 2019-2020 HOBARA REI